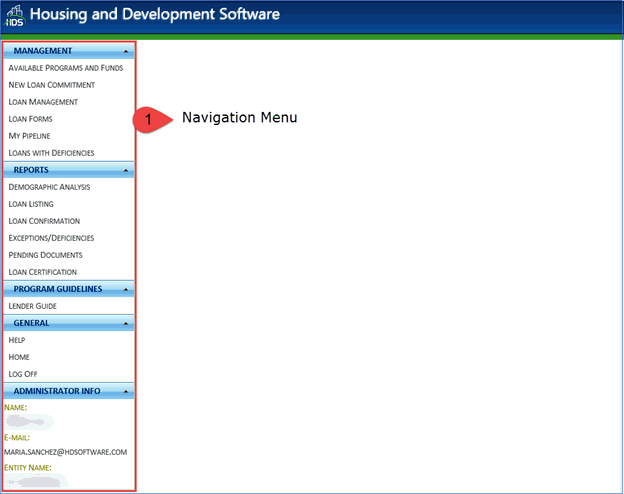
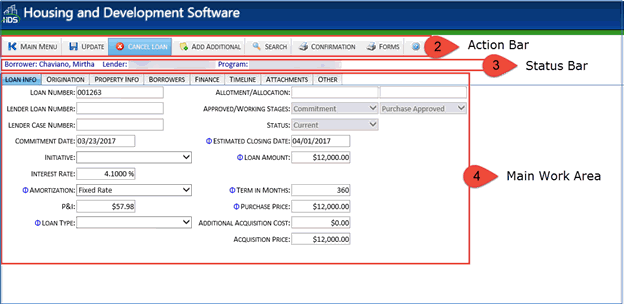
The Single Family Web Management system is divided into the following sections:
Navigation Menu: Displays links to the different areas of the system and is divided as follows:
Management: Display links to the screens in which loans are edited and reviewed.
Reports: Displays links to the reports which can be run in the system.
Utilities: Displays a link to the Data View & Download Tool, which allows users to create and record views containing information selected and organized by the user.
Program Guidelines: Displays a link to the Lender Guide, which allows users to display and print lender guidelines for selected programs.
General: Displays links to the Help file and the Home screen. It also includes a Log Off link that logs the user out of the system.\
Administrator Info: Displays the lender administrator's contact information. Any issues or requests should be brought directly to the administrator.
Click the Contract/Expand
button ![]() to contract or expand a menu.
to contract or expand a menu.

NOTE: Items listed in the Navigation menu are subject to permissions. Not all screens mentioned here may be listed.
Action Bar: Includes buttons for the actions which may be performed in the current screen. From left to right, the action bar is divided into three sections: the Action menu, the action icons (Update, Cancel Loan, etc), and the path of the current screen (for example, My Pipeline - Detail indicates that the user is currently in the My Pipeline screen and viewing the loan details of a specific loan.
NOTE: The Action Bar and Main Work Area change according to the selections made in the navigation column.
Status Bar: Displays the following information when viewing loans: Lender (or branch), Program under which the loan is reserved, Borrower name, Loan Number, Stage of the loan, and Status of the loan. Additionally, the Status Bar also indicates whether a loan is Read Only.
Main Work Area: When any of the links under the Management or Reports menu are clicked, the corresponding screen is displayed in this area. The Main Work Area is also the place where users can edit information.

A number of screens within SF Web rely heavily on the use of grids. For detailed information on SF Web grids, see Working with Grids.
Note (Screen Resolution): The minimum recommended screen resolution for the SF Web application, like all other HDS applications, is 1024x768. The minimum required screen resolution is 800x600.
Whenever an action is requested that requires the system to update the information on the screen, such as performing a search, or performing a validation, the Page Loading screen is displayed.
Please do not click the Back or Stop/Reload buttons on the browser while this screen is displayed. Clicking these buttons interrupts the present action being undertaken by the system.
A timer located in the notification bar of the browser window displays how much time a user has left before the system automatically logs the user out.
![]()
The clock is reset when the user performs an action such as submitting information, or switching to another page.
NOTE: If the Session Timer is not visible, click View > Toolbars > Status Bar in Microsoft Internet Explorer to display the timer.
Loan information is required in some fields before the user can proceed.
A small blue icon (![]() ) is displayed
adjacent to the required fields at all times. If no information is entered
in a required field, a red warning icon is displayed next to the blue
icon (
) is displayed
adjacent to the required fields at all times. If no information is entered
in a required field, a red warning icon is displayed next to the blue
icon (![]() ) when the information
is submitted. This information must be entered before the user is able
to proceed.
) when the information
is submitted. This information must be entered before the user is able
to proceed.